• Skip to primary navigation
  • Skip to main content
  • Skip to primary sidebar
The Diary of a Real Housewife
  • Easy Recipes
    • Appetizers & Sides
    • Breakfast
    • Dessert
    • Holiday Food
    • Kids Food
    • Main Dish
    • Slow Cooker
    • Soups & Salads
  • Holidays
    • Party
    • Super Bowl
    • Valentines Day
    • St. Patricks Day
    • Easter
    • 4th of July
    • Fall
    • Thanksgiving
    • Christmas
  • Episodes
  • Get Inspired
    • Recipe Roundups
  • Free Meal Planning Printable
menu icon
go to homepage
subscribe
search icon
Homepage link
  • Recipes
  • Episodes
  • About
  • Contact
  • Free Meal Planning Printable
    • Facebook
    • Instagram
    • Pinterest
    • Twitter
  • ×

    Home » Cookies » Muddy Buddy Cookies

    Muddy Buddy Cookies

    Published: Dec 19, 2019 · Modified: Sep 17, 2021 by Jennie · This post may contain affiliate links

    148 shares
    • Share
    • Tweet
    • Yummly
    • Email
    Jump to Recipe Print Recipe

    The classic treat turned cookie. These Muddy Buddy Cookies are so easy to make and they taste so delicious. 

    Muddy Buddy Cookies on a cutting board

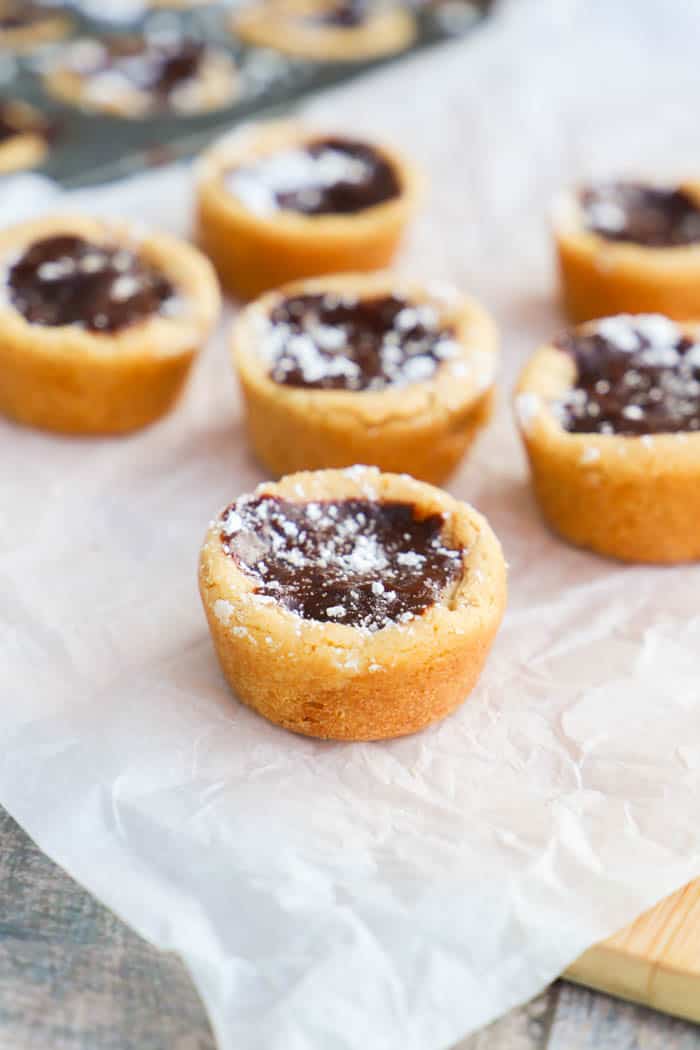
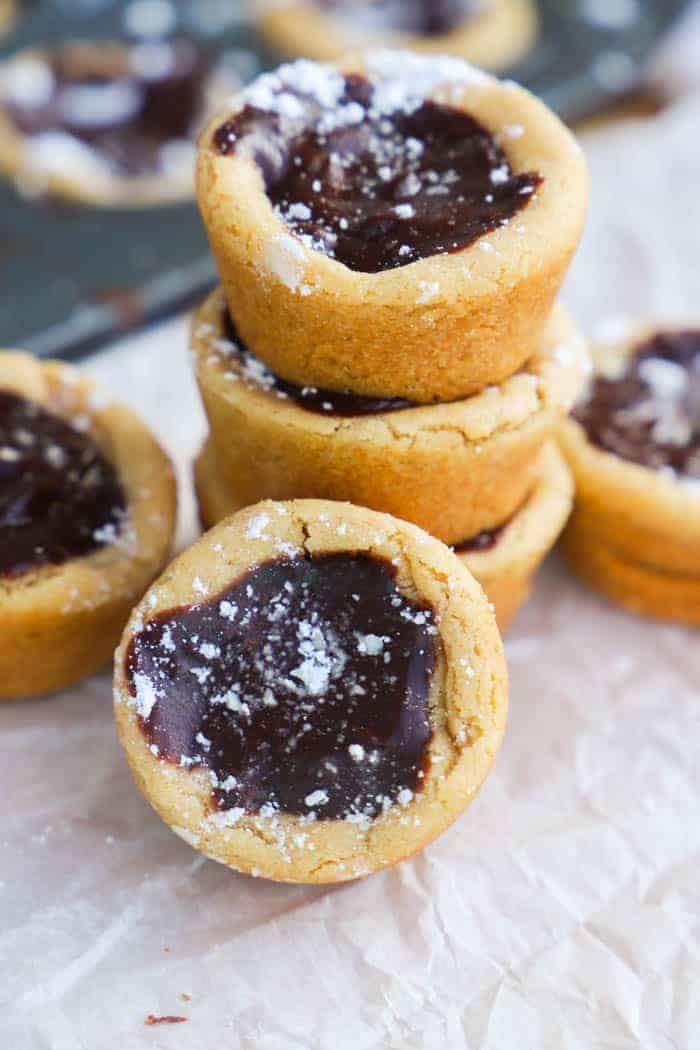
    Peanut butter cookies filled with chocolate and sprinkles with powdered sugar. These cookies are amazing.

    How to make Muddy Buddy Cookies:

    Step one: Get started by preheating your oven to 350 degrees F.

    Step two: In a stand mixer or using an electric hand mixer beat your peanut butter, butter, brown sugar, sugar, egg, and vanilla extract until fluffy.

    Step three: Now in a separate bowl combine, flour, baking soda, and salt and then slowly add it to the peanut butter mixture. Mix together until well blended.

    cookie dough in a pan

    Baking Directions:

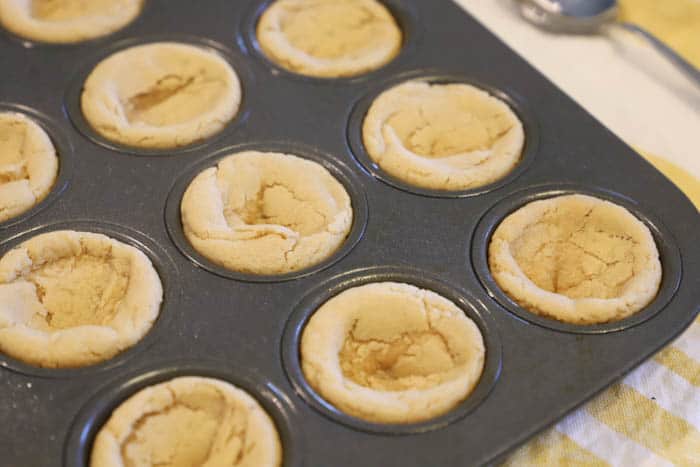
    Step four: When your dough is ready place a spoon size scoop in your dough into a mini muffin pan.

    Step five: Bake for about 8-9 minutes or until golden brown. While your cookies bake prepare your filling.

    making chocolate sauce

    How to make the filling:

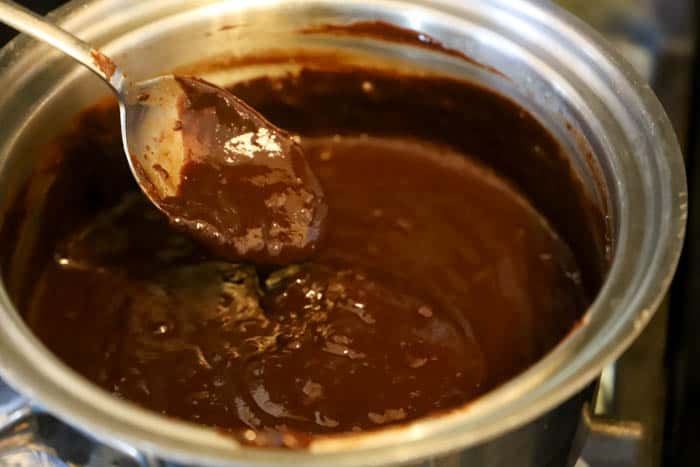
    Step six: To prepare your fillinf melt  your semi-sweet chocolate chips and heavy whipping cream in a saucepan over medium/low heat. Once melted and smooth remove from heat.

    cookies ready to bake

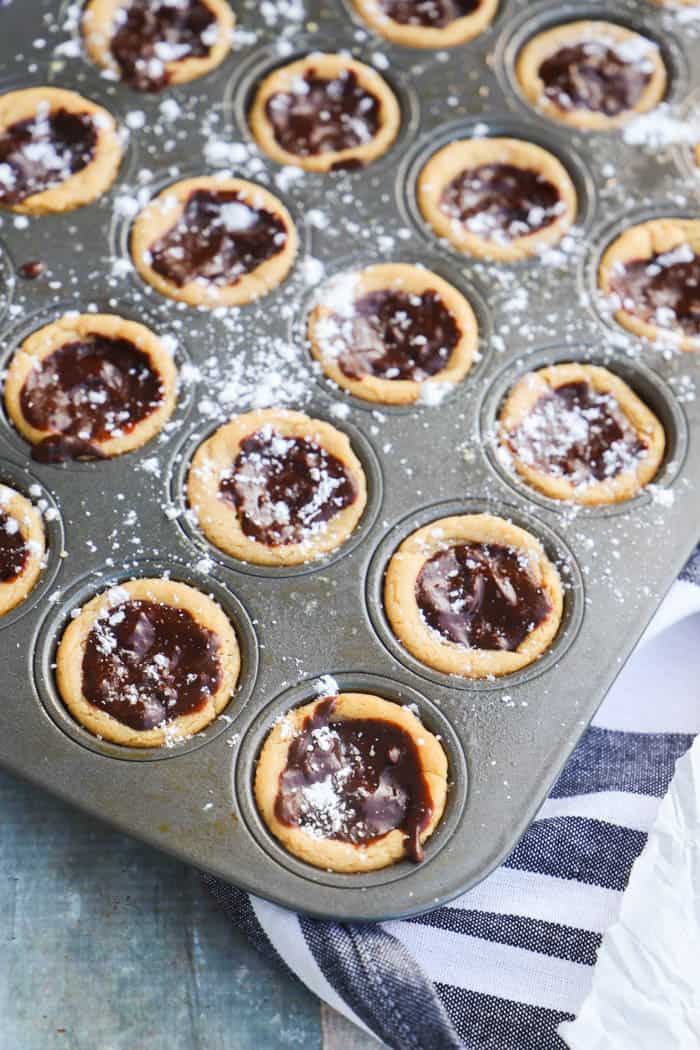
    Step seven: When your filling is done you can fill each cookie with chocolate sauce and sprinkle on powdered sugar.

    Muddy Buddy Cookies topped with powdered sugar

    How to Store Cookies:

    You can store these cookies in an airtight container for 2-3 days.

    Cookie Recipes:

    Try even more of my favorite recipes.

    • Chocolate Walnut Cookies
    • No-Bake Cookies
    • Mint Andes Cookies
    • Chocolate White Chocolate Chip Cookies

    Muddy Buddy Cookies stacked on top of each other

    If you tried any of my recipes I would love to hear from you, leave me a comment below. You can also connect with me on FACEBOOK, INSTAGRAM, and PINTEREST. I would love for you to follow along and discover more amazing recipes.

    Show me what you are making, use hashtag #TDOARH

    newsletter image with free printable


    Muddy Buddy Cookies stacked on top of each other

    Muddy Buddy Cookies

    Jennie Duncan
    The classic treat turned cookie. These Muddy Buddy Cookies are so easy to make and they taste so delicious. 
    Print Recipe Pin Recipe
    Prep Time 16 mins
    Cook Time 9 mins
    Total Time 25 mins
    Course Dessert
    Cuisine American
    Servings 24 cookies
    Calories 187 kcal

    Ingredients
      

    Cookie:

    • ½ cup peanut butter
    • ½ cup unsalted butter (softened)
    • ½ cup brown Sugar
    • ½ cup sugar
    • 1 egg
    • ½ teaspoon vanilla extract
    • 1 ½ cups all-purpose flour
    • ¾ teaspoon baking soda
    • ½ teaspoon salt

    Filling:

    • 1 cup semi-sweet chocolate chips
    • ¼ cup heavy whipping cream
    • ¼ cup powdered sugar (for topping)

    Instructions
     

    Cookie:

    • Preheat your oven to 350 degrees F.
    • Beat your peanut butter, butter, brown sugar, sugar, egg, and vanilla extract until fluffy.
    • In a separate bowl combine, flour, baking soda, and salt and then slowly add it to the peanut butter mixture. Mix together until well blended.
    • Place a spoon size scoop in your dough into a mini muffin pan.
    • Bake for about 8-9 minutes or until golden brown. While your cookies bake prepare your filling.

    Filling:

    • Melt semi-sweet chocolate chips and heavy whipping cream in a saucepan over medium/low heat. Once melted and smooth remove from heat.
    • Fill each cookie with chocolate sauce and sprinkle on powdered sugar.

    Notes

    How to Store Cookies:

    You can store these cookies in an airtight container for 2-3 days. 

    Nutrition

    Serving: 1cookieCalories: 187kcalCarbohydrates: 21gProtein: 3gFat: 11gSaturated Fat: 5gCholesterol: 21mgSodium: 114mgPotassium: 96mgFiber: 1gSugar: 13gVitamin A: 168IUCalcium: 16mgIron: 1mg
    Keyword Muddy Buddy Cookies
    Tried this recipe?Let us know how it was!
    signature


    « Tater Tot Breakfast Casserole
    Ritz Chicken Tenders »
    148 shares
    • Share
    • Tweet
    • Yummly
    • Email

    Reader Interactions

    Leave a Reply Cancel reply

    Your email address will not be published. Required fields are marked *

    Recipe Rating


    Primary Sidebar

    face

    Hi, I'm Jennie! I'm a busy mom of three and I love cooking and sharing easy recipes. From slow cooker meals to casseroles all my recipes are simple to make and ones the entire family will love.

    More about me

    Popular

    • Funfetti Dip
    • 5 Layer Dip
    • Taco Bowl
    • Pimento Cheese Dip

    Easy Recipes

    Footer

    ↑ back to top

    About

    • Privacy Policy

    Newsletter

    • Sign Up! for emails and updates

    Contact

    • Contact

    It is not permissible to copy anything from my site without prior written consent. Any use of a picture must have a working link back to my site.

    Some links on this site are affiliate links and always fully disclosed. This means I could earn a commission with clicks or purchases when using those links. No affiliate sways my decisions in products I use or love. All thoughts about items are 100% my own.

    Make sure to follow all safety procedures when completely any tutorials on my blog and assume your own risk. The Diary of a Real Housewife is not liable for any projects that you may complete from ideas found on this blog.

    Copyright © 2010 - 2021 · Jennifer Duncan, The Diary of a Real Housewife · All Rights Reserved.

    148 shares